

Building a data pipeline using BeautifulSoup, Apache Kafka, Apache Spark Streaming and MySQL


Here is a little fun side project to help you get your feet wet with Apache Kafka and Apache Streaming and at the same time give you a little overview of how different tools can work together to provide real world value.
We are going to build a simple web scrapper to get products data from amazon.com and push them into Kafka. After that a Spark job is going to read it from Kafka, do some simple processing and then save the result in a MySQL database.
Before we start it is important to set up the scope of this article. This article will not show how to:
- Download and install Apache Kafka, Apache Spark or MySQL
- Download and install pyspark, kafka-python or beautifulsoup
All the code used can be found in this repo. And with that said here we go.
The Scrapper
If you haven’t guess it by now, we are going to use Python for this one. One of the most popular libraries in python used for parsing html is BeautifulSoup.
Imagine for now that we have downloaded the web page and saved it in a variable -we will get to the downloading part later-. we pass the page to the BeautifulSoup function
soup = BeautifulSoup(htmlFile, 'lxml')
I have ran across some problems with the html.parser -it didn’t catch some elements-, that’s is why I used lxml. It is worth mentioning that lxml is also faster that html.parser and other parsers.
If you haven’t inspected the html code of an amazon.com page before, let me tell you that you are in for a treat. divs inside divs, lists inside lists that you would easily feel overwhelmed -at least I did-. After searching through lines of code and with a little help from Google chrome’s inspect element tool. I realized that the title of the product is always placed in a span with the id ‘productTitle’. so if we do this then we will get the title
soup.find("span", attrs={"id":'productTitle'}).string.strip()
similarly, if we searched for div with id ‘productDescription’, we will find a p element inside it with the product description
soup.find('div',attrs={'id':'productDescription'}).find('p').string.strip()
So far so good
For the product rating, we have to get a bit clever. The main rating is an icon of stars, we want to get the alternative text which is the rating in text. But the text is something like ‘4.2 out of 5 stars’. A simple split based on the white spaces will solve that problem for us.
soup.find(attrs={'id':'averageCustomerReviews'}).find("span", attrs={'class':'a-icon-alt'}).string.strip().split()[0]
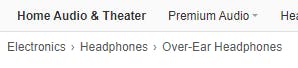
what about the product categories ?. well there is no single element in the page that list the categories. But up high at the top there are some links used for navigating
 Amazon saves the categories of the product in some strange places
This can work for us. I have chose to get all the categories and put all of them in a single string separate by commas. Using chrome’s inspect element tool have lead me to know exactly which element to look for. For better maintainability, I decided to make it a function
def GetCategories(div):
categories = ','.join([ e.string.strip() for e in div.find_all(['li','a'],attrs={'class':'a-link-normal'})])
return categories
with the call of the function being
GetCategories(soup.find(attrs={'id':'wayfinding-breadcrumbs_feature_div'}))
Lastly, the product prices. This was a bit tricky as there was two ways Amazon displayed prices. First there was the simple and easy way of displaying it directly on the same page
 The price is right under the title. And they are nice enough to display the Fees next to it
And then there is the hard way. you see, for some products there are multiple offers and prices.
 Multiple prices are handled differently
These prices are not stored on the same page. They are stored in another page which is loaded when the above link is clicked
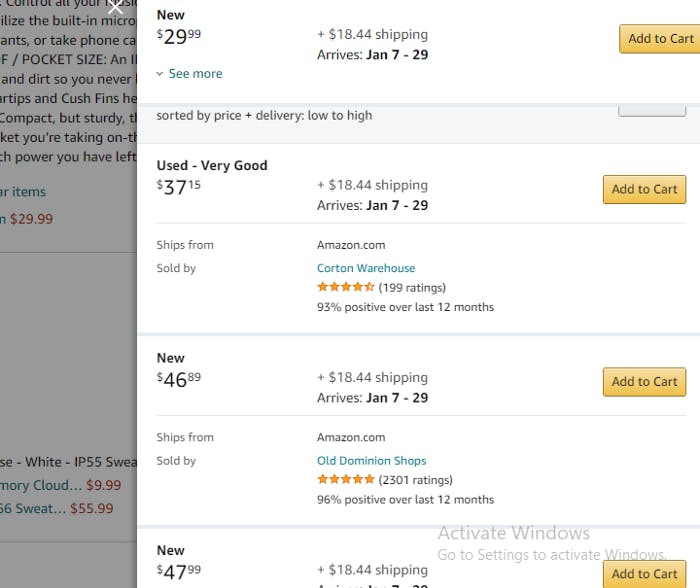 Multiple prices to choose from
So we need to write a function to look for the price right under the title, if it isn’t there then follow the link and get the prices from there. And since we already downloaded an extra page I figured I should retrieve all the prices and join them in one string separated by a delimiter.
Note that it is possible that you find both ways in some products. In this case I choose to take the easy way and extract the one on the same page.
I also felt that a good try/except is needed for this function specially.
def GetPrices(soup):
try:
if soup.find('div',attrs={'id':re.compile('olp-upd-new')}) == None:
if soup.find('div',attrs={'id':'price'}) == None:
exit
return '#'.join([soup.find('div',attrs={'id':'price'}).find('span',attrs={'id':'priceblock_ourprice'}).string])
link = soup.find('div',attrs={'id':re.compile('olp-upd-new')}).find('a',attrs={'class':'a-link-normal'})['href']
webPage = DownloadPage('https://www.amazon.com'+link)
miniSoup = BeautifulSoup(webPage,'lxml').body
productPrices = [e.find('span',attrs={'class':'olpOfferPrice'}).string.strip() for e in miniSoup.find_all('div',attrs={'class':'olpOffer'})]
return '#'.join(productPrices)
except Exception as e:
print(e)
And how do we exactly download a webpage ?. It is not that hard. We just use the requests package with some header and voila
def DownloadPage(link):
header = ({'User-Agent':'Mozilla/5.0 (Windows NT 10.0; Win64; x64) AppleWebKit/537.36 (KHTML, like Gecko) Chrome/85.0.4183.121 Safari/537.36',\
'Accept-Language':'en-US, en;q=0.5'})
webPage = requests.get(link,headers=header)
return webPage.content
Now our little scrapper is almost finished. Just missing extracting the URLs of the similar products and adding them to a link so that it can go forever. well actually not forever. You see Amazon like any company out there wants to protect its websites from cyber attacks. So after around 50-ish request amazon.com will deny every request you sent saying something like ‘please use our API instead of crawling our website’. So what would we do ?. Nothing. Just lie down and accept your fate. After all this is just a demo.
Where were we ?. ah yes extracting the URLs of the similar products
def GetProducts(soup):
links = []
for div in soup.find_all('div',attrs={'id':'similarities_feature_div'}):
if div.find('ol',class_='a-carousel') != None:
for e in div.find('ol',class_='a-carousel').find_all('a',attrs={'class':'a-link-normal'}):
if len(e['class']) == 1:
links.append(e['href'])
return links
The Kafka Producer
Writing a Kafka producer is really simple all you have to do is just write two three lines
producer = KafkaProducer()
producer.send('amazon', pickle.dumps(product))
The first line is the producer deceleration. Usually you pass the list of bootstrap servers as an argument but if you left it empty it will default to localhost:9092 which is exactly what I have.
The second line is the send method which you pass the name of the topic and the array of bytes you want to send. You can pass a key also but I don’t need to.
The topic is ‘amazon’. And for the array of bytes there are plenty of options for us to send all the data we extracted. What I chose is to put everything in a dictionary and serialize it using pickle.
Just a quick note, the send method in the producer is asynchronous. That is good for performance but make sure you flush before closing the program.
The Spark Job
For the streaming part, we will use the new structured streaming API. This has the benefit of using the same functions and methods as the structured batch processing API as you will see.
First lets define the spark session
spark = SparkSession.builder.master('local[2]').appName('StreamingDemo').getOrCreate()
Then we read from our Kafka source
df = spark.readStream.format('kafka')\
.option('kafka.bootstrap.servers','localhost:9092')\
.option('subscribe','amazon')\
.load()
The dataframe read will contain columns like value, key, timestamp …etc. What we care about is the value column. However, there is a problem. The value column carries the serialized data received from the Kafka server. We know that we can use pickle’s load method to deserialize it, but how can we use it on a dataframe ?. The answer is to use it inside a user-defined function.
deser = udf(lambda x: pickle.loads(x),MapType(StringType(),StringType()))
Great. So we add a column to our dataframe with the deserialized value
deserlizedDF = df.withColumn('map',deser(df['value']))
Then we use that dataframe to extract the columns from the deserialized dictionary.
parsedDF = deserlizedDF.withColumn('title',element_at('map','productTitle'))\
.withColumn('Categories',element_at('map','productCategories'))\
.withColumn('Rating',element_at('map','productRating'))\
.withColumn('Description',element_at('map','productDescription'))\
.withColumn('Prices',element_at('map','productPrices'))\
Assume that we want to extract the minimum and maximum prices which a product have. First we would split the prices string, then have to cast all the elements into float so that we can compare between them. Numerical comparison is the correct way of comparison as string comparison will return that 8.99 is larger that 20.99.
.withColumn('Max_Price',array_max(split(element_at('map','productPrices'),r'#*\$').cast(ArrayType(FloatType()))))
The regular expression used to split may look weird because it is used to both split the string and remove the $ before every price. And that is a good reminder to check the data at the source before sending them to Kafka to save some useless transformations afterwards.
Lastly, we select only the data we care about from the dataframe
projectedDF = parsedDF.select('title','Categories','Rating','Prices','Min_Price','Max_Price')
What is left now is saving the result into the MySQL database. Spark structured streaming support many targets or sinks as they call it directly. But databases are not one of them -I know, shocking !!!-. It still enables you to write the result of your stream to a database but not directly.
Let me explain
Additionally to the many sinks Spark provide directly, it provides two methods to use for other sinks. foreach and foreachBatch. foreach deals with each row appended to the stream, while foreachBatch deals with each batch. We pass a function to both methods to handle the data we receive. In our case using foreach feels like a bit of an overkill, so I chose foreachBatch
result = projectedDF.writeStream.foreachBatch(foreach_jdbc_writer).start()
The function passed to the foreachBatch will receive a dataframe repesenting the batch and a unique id for the batch. It is inside this function that we use the dataframe object to write the data into the MySQL database
def foreach_jdbc_writer(df,epoch_id):
df.write.\
jdbc(url="jdbc:mysql://localhost/world",table="amazon_products",mode='append',properties={"driver":"com.mysql.cj.jdbc.Driver","user":"ahmed"})
Finally we added the one line you should never forget in a Spark streaming job
result.awaitTermination()
Also don’t forget adding
--packages org.apache.spark:spark-sql-kafka-0-10_2.12:3.0.1 --jars mysql-connector-java-8.0.20.jar
to your Spark Application call.
And That’s it. Fire your Spark job and you scrapper and enjoy a cup of coffee while your scrapper indulge on an adventure in the land of amazon.com .But make it instant coffee as it will be a short adventure.
See you Space Cowboy